Artículo: How To Get Silver Grey Hair At Home: Bleach + Tone Guide
How To Get Silver Grey Hair At Home: Bleach + Tone Guide
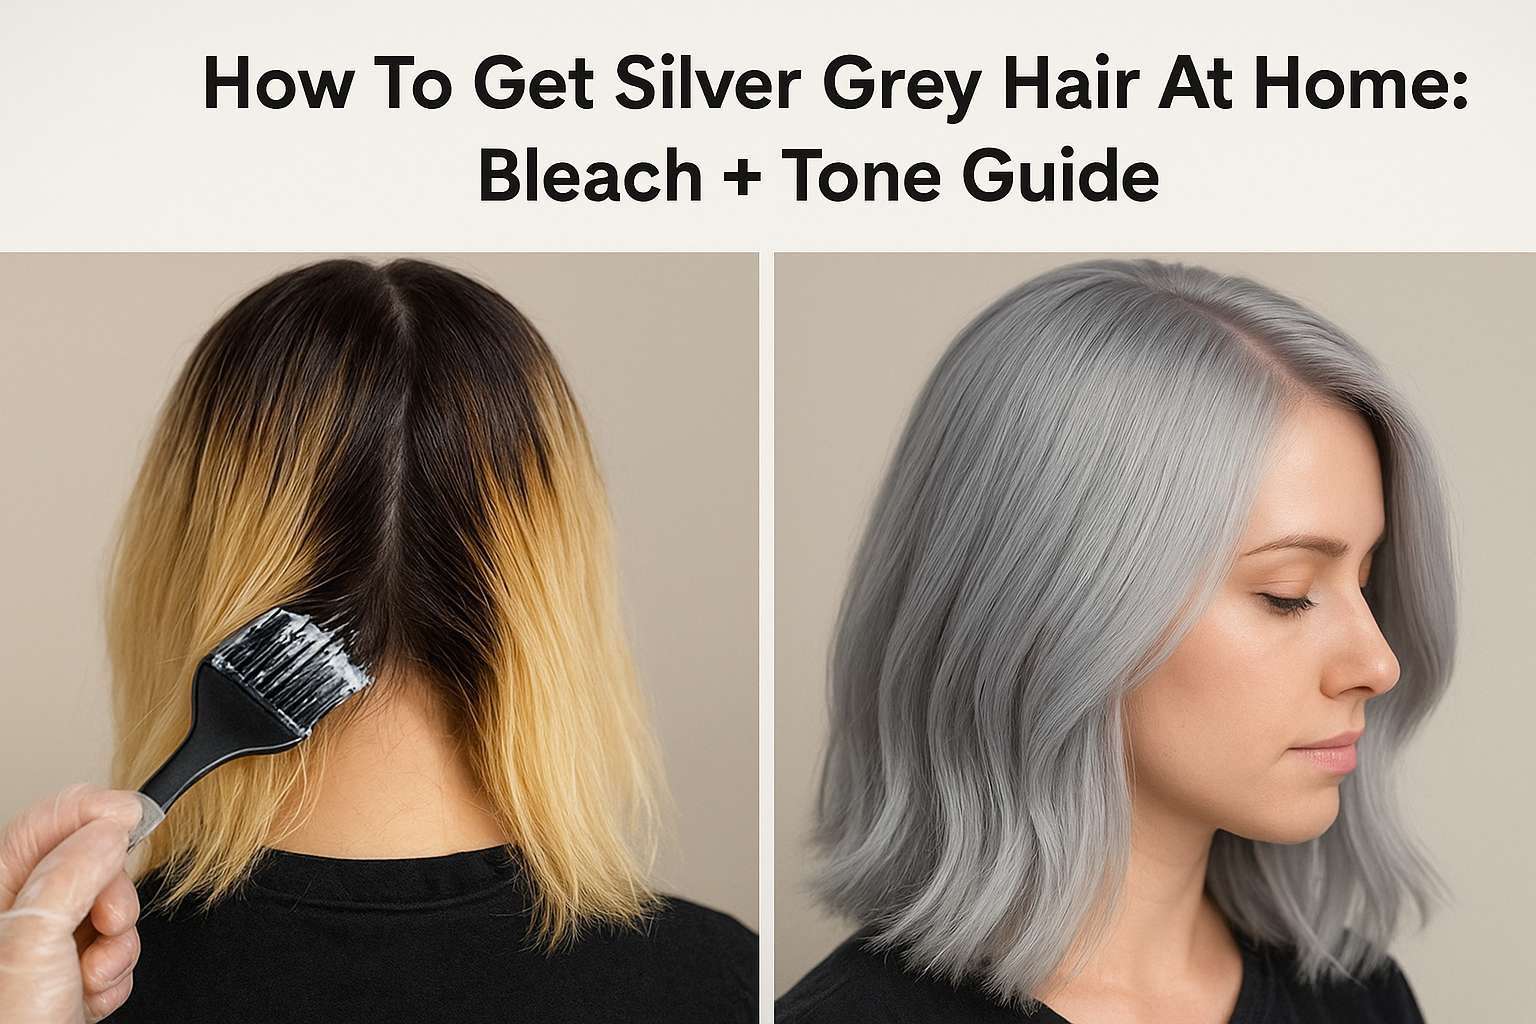
Silver grey hair is one of those shades that looks effortlessly cool, but getting there takes a bit of effort. If you're wondering how to get silver grey hair at home, the honest answer is that it's a two-stage process: bleach first, then tone. Skip either step, and you'll end up with brassy yellow or patchy results instead of that sleek, icy finish you're after.
The good news? You don't need a salon appointment to pull it off. With the right products and a clear plan, stunning silver grey results are absolutely achievable in your own bathroom. At Smart Beauty, we've developed plex-enriched, PPD-free hair dyes, including dedicated silver and grey shades, specifically to make this process safer and kinder to your hair.
This guide walks you through everything from pre-lightening your hair to applying your silver toner, along with aftercare tips to keep your colour looking fresh. Whether you're starting from blonde, light brown, or darker hair, you'll know exactly what to expect at each stage before you begin.
Before you start: hair level, tools and safety
Before you get started on how to get silver grey hair at home, you need to understand one crucial fact: silver and grey tones only show up on very light hair. Your starting point matters more than anything else in this process. If your hair is currently dark, you'll need to pre-lighten it before toning will make any visible difference. Skipping this step is the single biggest reason people end up disappointed with their results.
Understanding hair levels
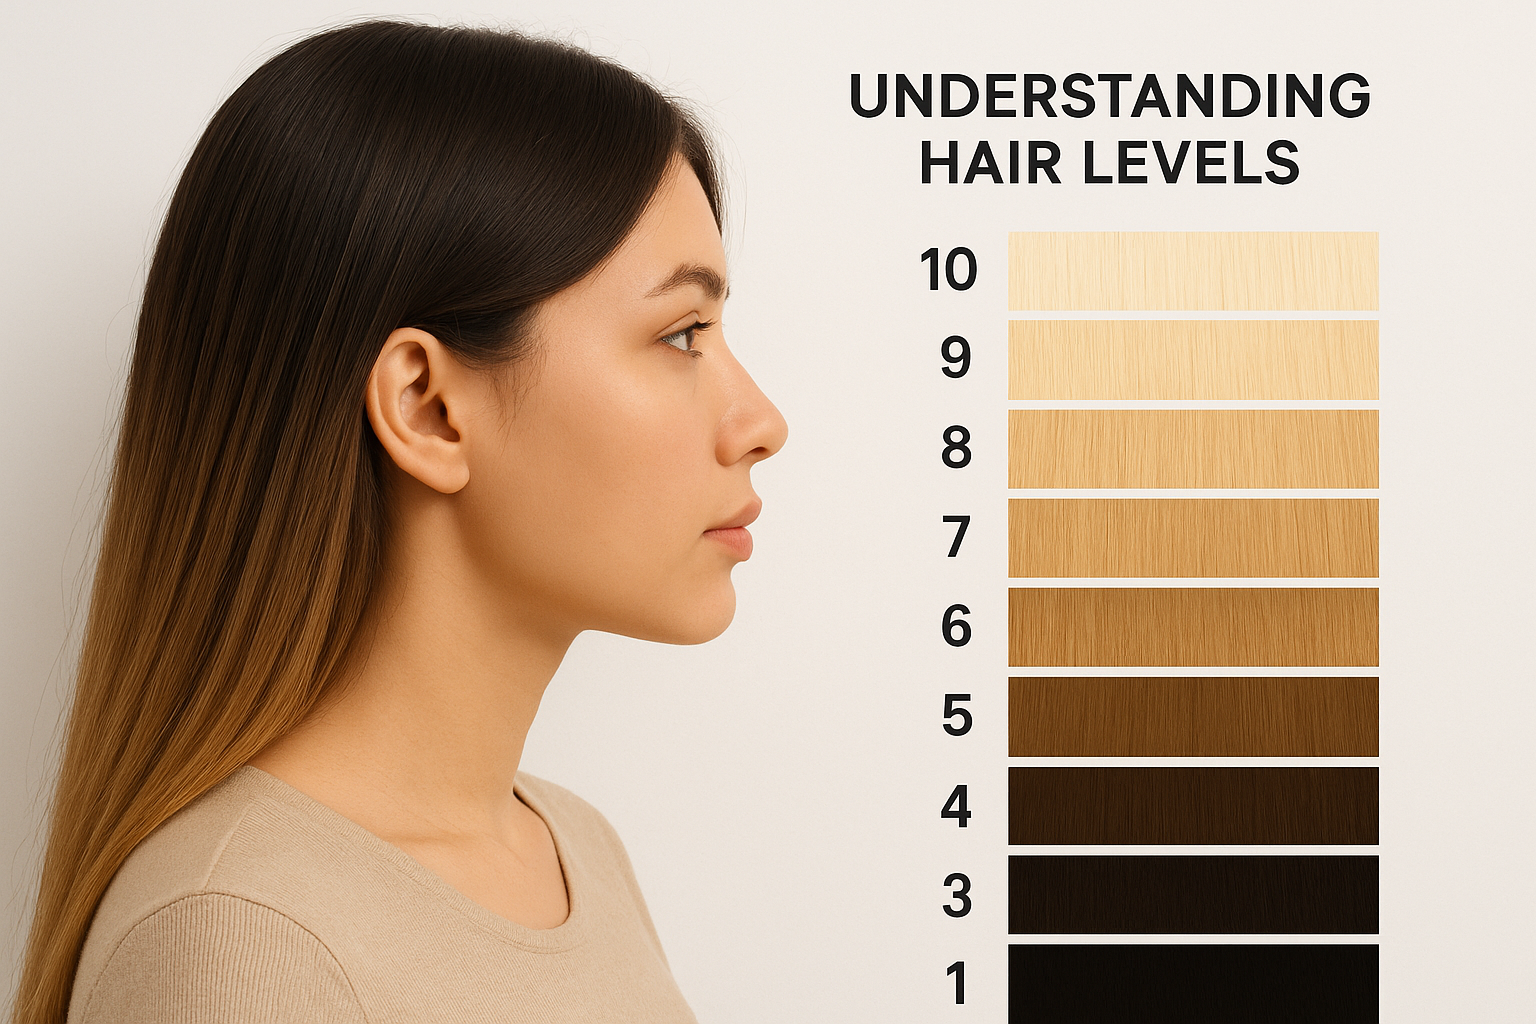
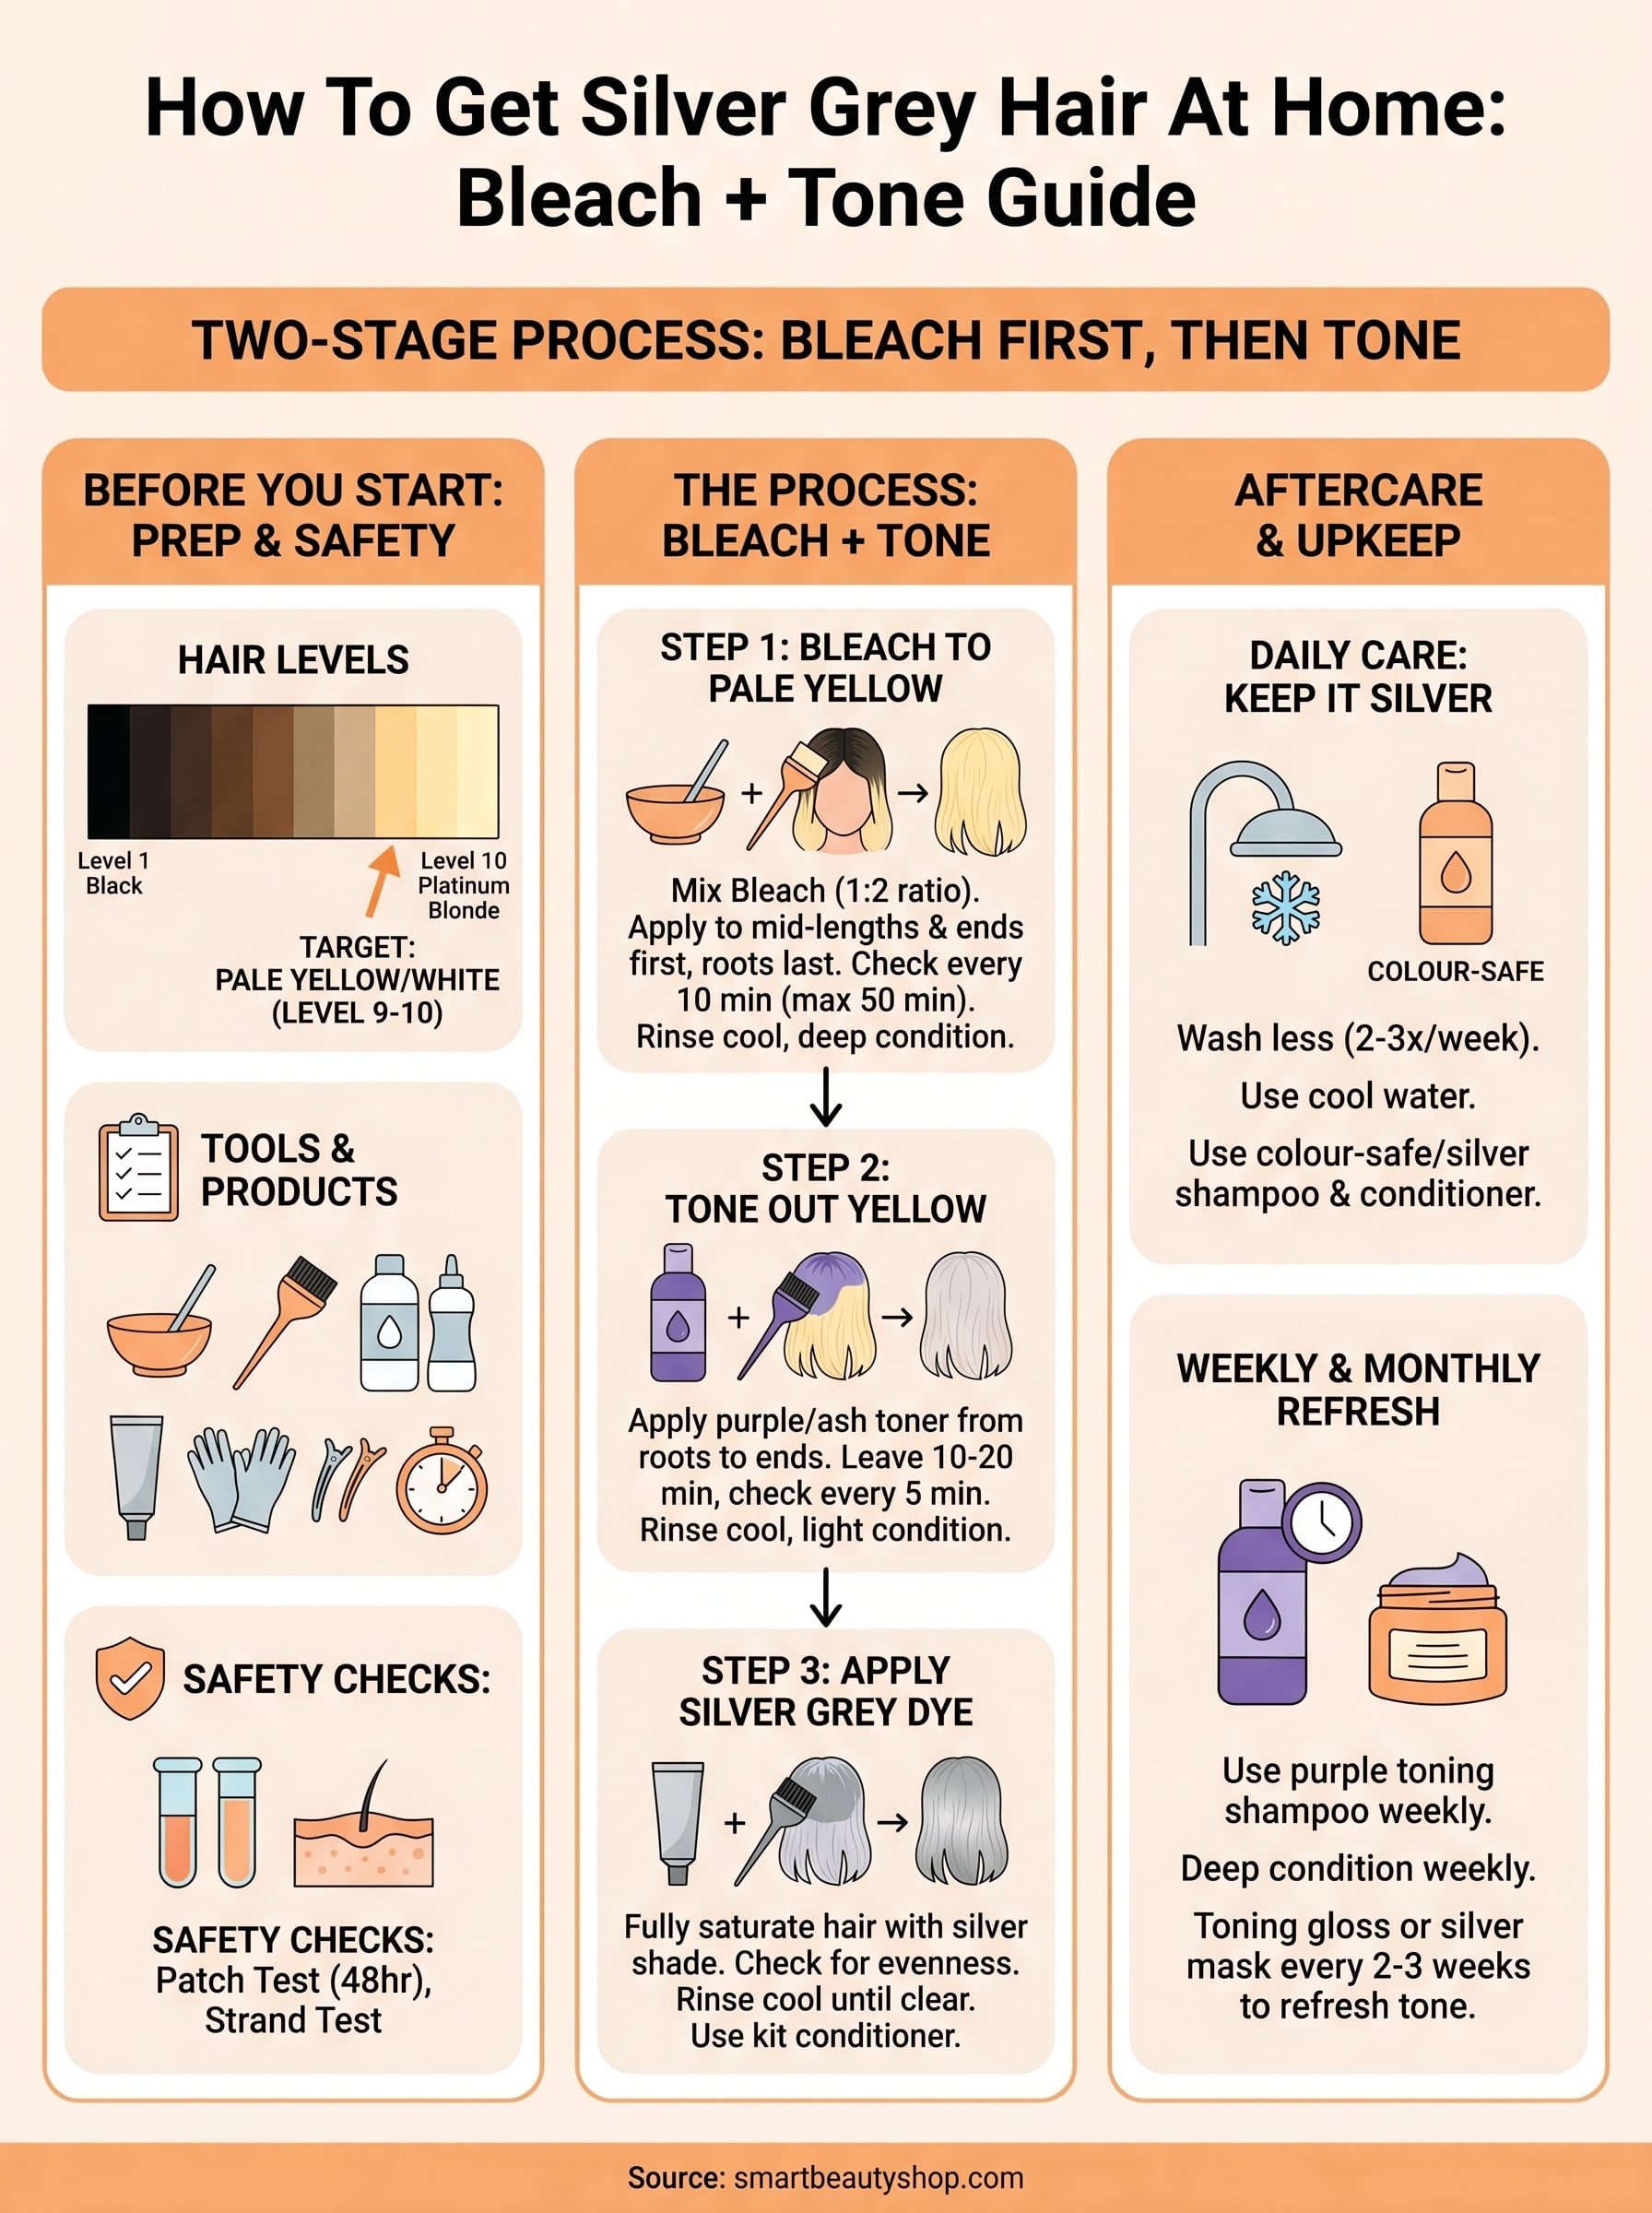
Hair colour is measured on a level scale from 1 (black) to 10 (platinum blonde). To achieve silver grey, you need to lift your hair to at least a level 9, which appears pale yellow or almost white. Anything darker, and your silver toner simply won't have a light enough base to show up correctly.
Here's a rough guide to what to expect based on your current colour:
| Starting Colour | Approximate Level | Bleaching Sessions Needed |
|---|---|---|
| Black or very dark brown | 1-2 | 3+ sessions (spaced weeks apart) |
| Medium brown | 4-5 | 2-3 sessions |
| Light brown | 6-7 | 2 sessions |
| Dark blonde | 8 | 1-2 sessions |
| Light blonde | 9-10 | 0-1 sessions |
Never bleach your hair more than once in a single day. Space sessions at least two weeks apart to protect your hair's structure and reduce the risk of serious breakage.
Tools and products to gather
Pulling everything together before you start means you won't need to stop mid-process, which is one of the most common reasons results go patchy or uneven. Make sure you have the following ready:
- Bleach powder and developer (20 volume for fine or already-lightened hair, 30 volume for resistant hair)
- Silver or grey toning dye such as Smart Beauty's silver grey shades
- A mixing bowl and tint brush for even application
- Sectioning clips to divide hair into manageable portions
- Old towels and a dark top you're happy to stain
- Petroleum jelly to protect your hairline, ears, and neck
- Gloves, which are usually included in your dye kit
- A kitchen timer to avoid over-processing
Safety checks you must do first
A patch test 48 hours before any chemical application is non-negotiable, even if you've coloured your hair before. Sensitivities can develop at any point, so you need to test each new product individually. Apply a small amount behind your ear or inside your elbow, leave it, and check for any redness or irritation after the full 48 hours.
You should also do a strand test on a small, hidden section of hair before going ahead with the full application. This shows you exactly how your hair reacts to the bleach timing, what level you reach, and whether the toner produces the result you want. A strand test takes around 20 minutes and can save you several hours of corrective work later.
Step 1. Lift your hair to pale yellow with bleach
Bleaching is the foundation of how to get silver grey hair at home, and getting this stage right determines everything that follows. Your goal here isn't to reach a generic blonde - it's to lift to a pale, almost white yellow (level 9-10) so your silver toner has a clean enough base to work with. If you pull the bleach too early and your hair is still golden or brassy orange, the silver tone will come out green or muddy rather than cool and icy.
How to mix and apply your bleach
Mix your bleach powder and developer in a 1:2 ratio in your mixing bowl unless your specific kit states otherwise. Work quickly once mixed, as the formula activates immediately. Section your hair into four quarters: front left, front right, back left, and back right. Clip each section up and work through them one at a time, starting from the back of your head.
Apply the bleach to your mid-lengths and ends first, leaving the roots until last. Roots process faster because of the natural heat from your scalp, so applying them last helps everything develop more evenly across the full length. Use your tint brush to saturate each section thoroughly before moving on. Patchy coverage at this stage leads directly to patchy colour later.
Timing and rinsing
Check your hair every 10 minutes by wiping a small section clean with a damp cloth rather than leaving it and hoping for the best. The maximum processing time for most bleach products is around 50 minutes, but you should rinse as soon as your hair reaches that pale yellow target. Leaving bleach on beyond what's necessary adds damage without improving the lift.
The lighter and more even your bleach result, the cleaner and truer your silver tone will appear in the next step.
Rinse the bleach out thoroughly with cool water and follow immediately with a deep conditioner. Leave the conditioner on for at least five minutes before rinsing again. Your hair will feel more fragile than usual at this point, which is a normal response to the lifting process. Avoid heat styling until you've completed the full colour application.
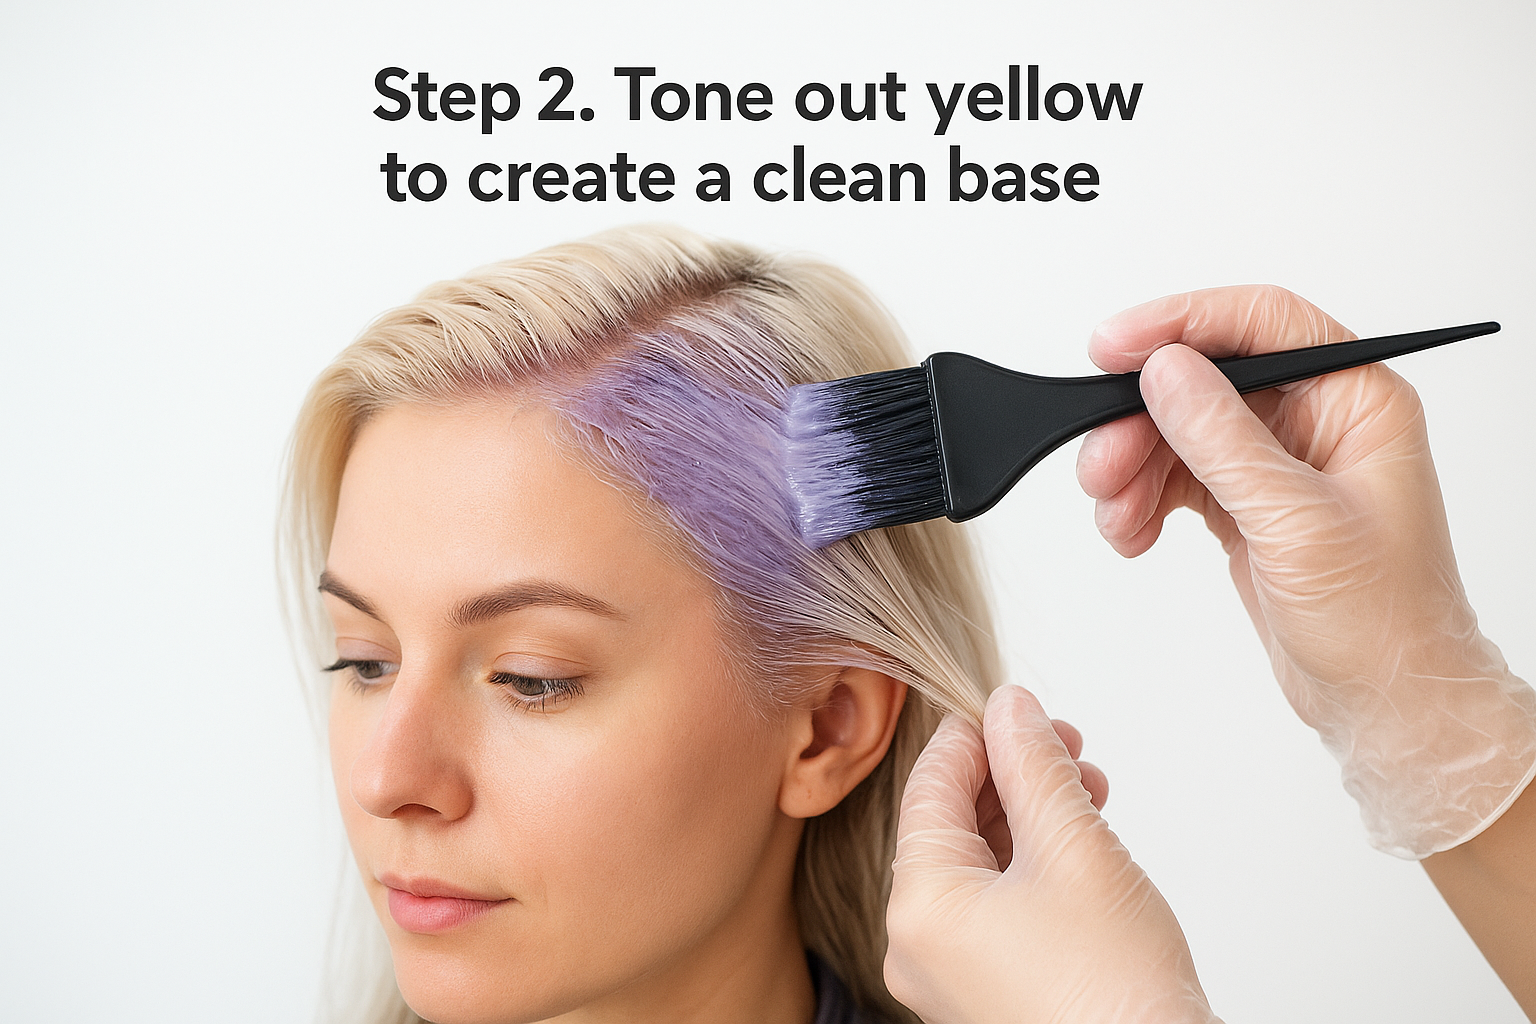
Step 2. Tone out yellow to create a clean base
Once your hair is bleached and dried, you'll likely notice it still carries a yellow or pale gold tone even at level 9-10. That warmth needs to go before you apply your silver shade. Toning at this stage neutralises the underlying yellow using cool violet or ash pigments, which sit opposite yellow on the colour wheel and cancel it out. Think of it as resetting your hair to a near-neutral base so your silver can read true.
Why toning before silver matters
Skipping the toning step is one of the most common mistakes people make when figuring out how to get silver grey hair at home. If you apply a silver dye directly over yellow hair, the two colours mix on your strands and produce a result that reads green or dull khaki rather than cool metallic silver. A dedicated pre-toning pass takes around 10 to 20 minutes and makes a significant difference to your final result.
Even if your bleached hair looks pale, apply a toner first. Yellow that seems subtle to the eye will still throw off your silver tone.
How to apply your toner
Choose a purple-based or ash toner suited to your level of yellow. A violet toning conditioner works well for light, creamy yellow hair, while a more concentrated ash toner handles deeper yellow more effectively. Mix and apply it the same way you would a standard dye: section your hair, work from roots to ends, and set a timer.
Leave the toner on for 10 to 20 minutes, checking every five minutes by wiping a small section clean. You're looking for a result that's pale, cool, and as close to white or silver-white as possible. Rinse with cool water and follow with a light conditioner. Avoid a heavy mask at this point, as your hair still needs to absorb the silver dye in the next step.
Once your hair looks consistently cool-toned with no visible yellow patches, you're ready to move on to the silver application.
Step 3. Add the silver grey shade and even it out
With a cool, toned base in place, you're finally ready for the step that makes it all worthwhile. Applying your silver grey dye correctly at this stage is what separates a flat, patchy result from a smooth, professional-looking finish. This is the most satisfying part of learning how to get silver grey hair at home, but it still needs a careful, methodical approach to get right.
How to apply your silver grey dye
Mix your silver grey shade according to the instructions on the pack. Smart Beauty's silver grey formulas are plex-enriched, which means they deposit colour while strengthening your hair at the same time. Divide your hair into the same four sections you used during bleaching, and work systematically from back to front so you can track your progress clearly.
Apply the dye using a tint brush, working it through each section from roots to ends. Press the product into your hair firmly rather than running it through loosely. Loose application is one of the main causes of uneven coverage, particularly around the hairline and at the crown where hair tends to be finer. Make sure every strand is fully saturated before moving on to the next section.
Set a timer for the full development time listed on your product, and check a strand at the midpoint to see how the colour is reading against your base.
How to check for evenness and fix patchy areas
Once the development time is up, check your hair under natural or bright lighting before you rinse. Part your hair in multiple directions and look closely at the mid-lengths, roots, and any areas that were harder to reach during application. If you spot sections that look paler or more yellow than the rest, apply a small amount of product directly to those areas and leave for a further five to ten minutes before rinsing.
Rinse with cool water only until the water runs completely clear. Hot water opens the hair cuticle and pushes colour out faster, so keeping the temperature low helps your silver shade last longer from the very first wash. Finish with the conditioner included in your kit, or use a colour-safe treatment to smooth the cuticle and lock in shine.
Keep it silver: aftercare, upkeep and quick fixes
Silver grey is one of the highest-maintenance colour families you can choose, but with the right routine it stays sharp for weeks. The core reason silver fades quickly is that your hair's cuticle, already opened during bleaching, releases cool pigment rapidly with every wash. Building a simple care routine from day one slows that process down significantly and extends the life of your colour.
Washing and conditioning silver hair
Wash your hair as infrequently as possible, aiming for no more than two or three times a week. Each wash lifts a small amount of pigment from the shaft, so reducing wash frequency is the single most effective thing you can do to keep your silver looking fresh. When you do wash, use cool or lukewarm water from start to finish, as hot water forces the cuticle open and accelerates colour loss.
Use a colour-safe or silver-specific shampoo and conditioner on every wash. Standard shampoos are often more alkaline, which strips cool tones faster. A purple toning shampoo used once a week in place of your regular shampoo helps offset any yellow that builds up between colour sessions. Leave it on for three to five minutes before rinsing for best results.
Apply a deep conditioning mask once a week to keep bleached hair strong and supple, which helps colour sit more evenly on each strand.
Fixing brassiness between colour sessions
Even with a good washing routine, warmth creeps back in after two to three weeks. When that happens, you don't need to repeat the full process of how to get silver grey hair at home from scratch. A toning gloss or silver conditioning mask applied to dry hair for 20 minutes can refresh the tone without the commitment of a full dye application.
For small, localised patches that look more yellow than the rest of your hair, apply a targeted amount of your silver dye to those sections only. Timing these quick fixes every three to four weeks keeps your colour looking intentional rather than faded. Keep a spare kit at home so you can act as soon as you notice the shift beginning.
Your next silver touch-up plan
Now you have a complete picture of how to get silver grey hair at home, from the first bleach application through to your weekly toning shampoo. The process works best when you treat it as a rolling plan rather than a one-off project. Bleach when you need to lift new growth, tone every two to three weeks, and use a silver conditioning mask in between to keep the colour crisp.
Your first full attempt teaches you the most. Note how long your bleach took to reach level 9, how your hair responded to the toner, and which areas needed extra attention during the silver application. That information makes every future session faster and more predictable.
When you're ready to stock up on everything you need, explore Smart Beauty's creative colour system for bold, expressive shades at home and find the perfect silver grey formula for your hair.


